Exam Topics
- F5CAB1
- F5CAB1.03
- Show provisioned modules – CLI/config/TMUI
- F5CAB1.05
- Show provisioned modules
- Show resource utilization of provisioned modules
- Report modules which are provisioned but not licensed
- F5CAB1.03
Introduction
In the article License Overview, we explained how the Base Registration Key is used to license a BIG-IP system and unlock its core capabilities.
The F5 BIG-IP platform operates using modules, each adding specific functionality to the system.
However, before a licensed module can be used, it must be provisioned. This process activates the module and allocates the necessary system resources for it to operate.
What is an F5 Module?
The F5 BIG-IP platform comes with the Local Traffic Manager (LTM) module preinstalled : this is the core functionality that provides advanced load balancing and traffic management capabilities.
An F5 module is an additional software component that extends the BIG-IP system’s functionality beyond basic load balancing. Each module adds specialized features tailored to specific needs. For example, the Access Policy Manager (APM) provides advanced authentication and secure access control, the Advanced WAF (formerly ASM) delivers comprehensive web application protection, and the DNS module (formerly GTM) enables intelligent global traffic distribution.
By combining multiple modules, administrators can transform a BIG-IP device from a simple load balancer into a powerful, multi-service application delivery platform.
How to provision new module ?
Now that you know modules can add powerful new functionalities to your BIG-IP system, let’s explore how to provision them in order to make them operational.
By default, only the LTM module is provisioned. To use additional modules, they must first be provisioned on the system.
This is achieved through the Resource Provisioning process, which allows administrators to enable specific modules and define how system resources (like CPU, memory, and disk space) are allocated to them.
Only licensed modules should be provisioned, unlicensed modules will remain unavailable.
When provisioning a module, you can choose from four provisioning levels that will determine how the ressource will be allowed:
- None (Disabled)
The module is not provisioned and does not run on the system. This is the default and also the only option for non-licensed modules. - Dedicated
The system allocates all CPU, memory, and disk resources exclusively to a single module.
When this mode is selected, all other modules are automatically disabled.
This mode is typically used for high-performance or specialized deployments (for example, a dedicated BIG-IP DNS). - Nominal
When first enabled, the module receives the minimum resources required to operate.
After all modules are enabled, it can receive additional resources from what remains available on the system. - Minimum
The module receives only the absolute minimum resources needed to function, with no additional allocation beyond that baseline.
Let’s take an example where LTM and APM modules are provisioned as Minimum, and ASM is provisioned as Nominal.

- Initial allocation: All modules receive the minimum required memory and CPU needed to operate.
- Note: Different modules have different minimum requirements depending on their functionality and resource needs. For example, LTM might require less memory than ASM or APM.
- Nominal allocation: Once all modules are enabled, those provisioned as Nominal (in this case, ASM) can check the remaining available system resources.
- Resource adjustment: Since additional memory is available, the ASM module receives an extra 400 MB of memory on top of its minimum allocation, allowing it to perform better without starving other modules.
In short:
- Dedicated: All system resources go to one module; others are disabled.
- Nominal vs. Minimum: Both start with the minimum resources, but Nominal modules can later receive extra capacity from unused resources, while Minimum modules cannot.
This flexibility allows administrators to optimize system performance and resource allocation based on deployment needs. If a module is expected to be heavily used, selecting Nominal (or Dedicated when only a single module is active) ensures it receives sufficient resources for peak performance. Conversely, modules that are rarely used can be set to Minimum, reserving resources for more critical functions while still keeping the module available.
Provision a module using the Configuration Utility (tmui)
To provision modules using the BIG-IP Configuration Utility (TMUI), navigate to System → Resource Provisioning.
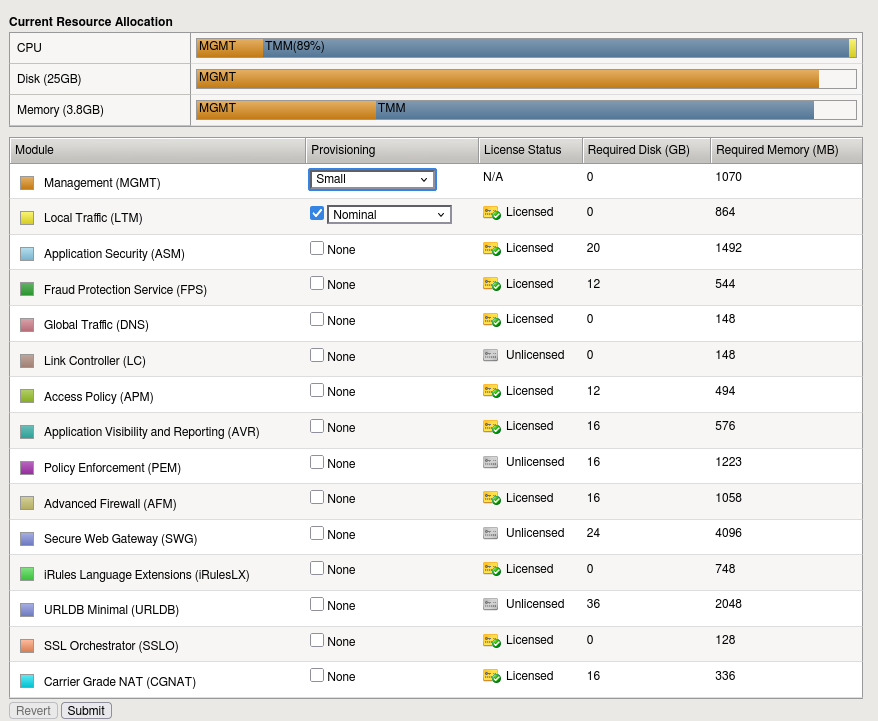
In this menu, you will see a list of modules, their licensed status and their current provisioning levels. Simply select the module you want to configure and choose the desired provisioning level, None, Minimum, Nominal, or Dedicated, depending on your resource and usage requirements. Once you’ve made your selection, click Submit to apply the changes.
The resource allocation bar provides a visual preview of how system resources will be distributed among the modules before you apply the changes.
Provision a module using the Command line (tmsh)
Provisionning of module can also be done using the Command line with tmsh. the list sys provision command will display the actual level allocated to module :
sys provision avr { }
sys provision gtm { }
sys provision lc { }
sys provision ltm {
    level nominal
}
In this example, only ltm is provisionned with the level of nominal. You can use the following command to provision a new module :
modify sys provision module level {minimum|nominal|dedicated|none}
Resource utilization of provisionned modules
While the Configuration Utility (TMUI) provides only an approximate overview of resource utilization, the command line offers precise and detailed metrics for CPU, memory, and disk usage per module.
You can check these values using the following tmsh command:
show sys provision
This command displays a table summarizing how system resources are distributed among the different modules.
For example, on a BIG-IP system where LTM is provisioned with Minimum resources and APM is provisioned as Nominal, you might see output similar to this:
root@(mybigip)(cfg-sync Standalone)(avrd DOWN)(/Common)(tmos)# show sys provision

---------------------------------------------------------
Sys::Provision
Module  CPU (%)  Memory (MB)  Host-Memory (MB)  Disk (MB)
---------------------------------------------------------
afm           0            0                 0          0
apm           1          352               324          0
asm           0            0                 0          0
avr           0            0                 0          0
cgnat         0            0                 0          0
dos           0            0                 0          0
fps           0            0                 0          0
gtm           0            0                 0          0
host         10         1636                 0      23667
ilx           0            0                 0          0
lc            0            0                 0          0
ltm           1            0                 0          0
pem           0            0                 0          0
sslo          0            0                 0          0
swg           0            0                 0          0
tmos         88         1964               140          0
urldb         0            0                 0          0
In this example, you can see that the APM (Access Policy Manager) module is provisioned and allocated 1 CPU and 352 MB of memory. LTM module gets 1 CPU.
What happens when an unlicensed module is provisioned
It is technically possible to provision a module that is not licensed on a BIG-IP system. However, even though the provisioning process may complete, the module will not operate or provide any functionality.
The system may still allocate CPU, memory, and disk resources as if the module were active, but its services and features remain disabled because they are not covered by a valid license. This can lead to wasted system resources without any functional benefit.
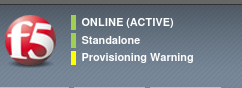
In the Configuration Utility (GUI), a “Provisioning Warning” banner will appear in the top-left corner of the interface, alerting administrators that one or more modules are not properly licensed.
When accessing the system via the command line, a similar warning is visible in the command prompt. For example:
[root@mybigip:ModuleNotLicensed::Active:Standalone] config #
This makes it immediately apparent that a provisioned module is inactive due to missing or expired licensing.
To resolve the issue, you have two options:
-
License or renew the module so it can function properly.
-
Unprovision the module to remove the warning and free up system resources.
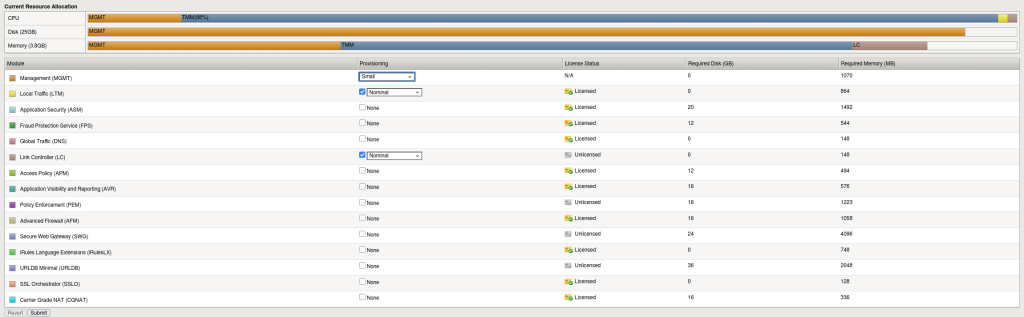
In this example, the Link Controller (LC) module is provisioned but not licensed. In the module list, the License column displays “Unlicensed”, indicating that the module is active in configuration but not operational due to missing license validation.
Conclusion
Resource provisioning is an essential step in managing F5 BIG-IP modules. It allows you to activate licensed modules and allocate system resources according to your deployment needs. Proper understanding of provisioning levels ensures optimal performance while avoiding unnecessary strain on the system.
Key Points to Remember:
- Licensed modules only: A module must be licensed before it can be provisioned or it will not work.
- Provisioning levels:
- None / Disabled: Module is inactive.
- Minimum:Module receives only the minimum resources needed.
- Nominal: Module receives minimum resources initially and may get extra from available system resources.
- Dedicated: Module gets all system resources; all other modules are disabled.
- Impact on traffic: Provisioning restarts all services, potentially disrupting traffic.